Deploy Velostrata (on premise and GCP) and Configuration
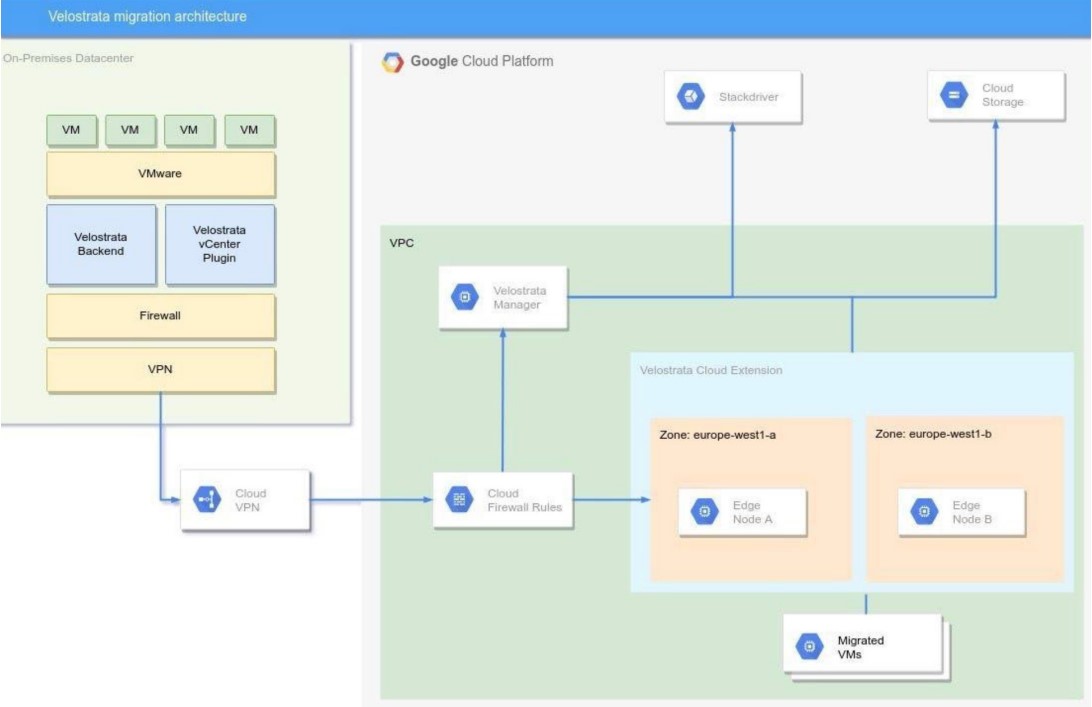
Topics • Diagram
• VPN On-Prem to GCP
Workload migration between the On-Prem environment and the Cloud lacks a secure and private connection. For this reason, configuring a VPN is strictly necessary before the migration process begins.
The classic VPN was the solution chosen given that the maximum capacity allowed for the creation of the tunnel IPSec (3 Gbps), it was sufficient for the existing connections in the On-Prem environment (a link of 100 Mbps/100 Mbps and a link of 120 Mbps/12 Mbps). HA VPN was another option that we studied, however, as it is still in beta version, it is not guaranteed SLA so we opted for the Classic VPN.
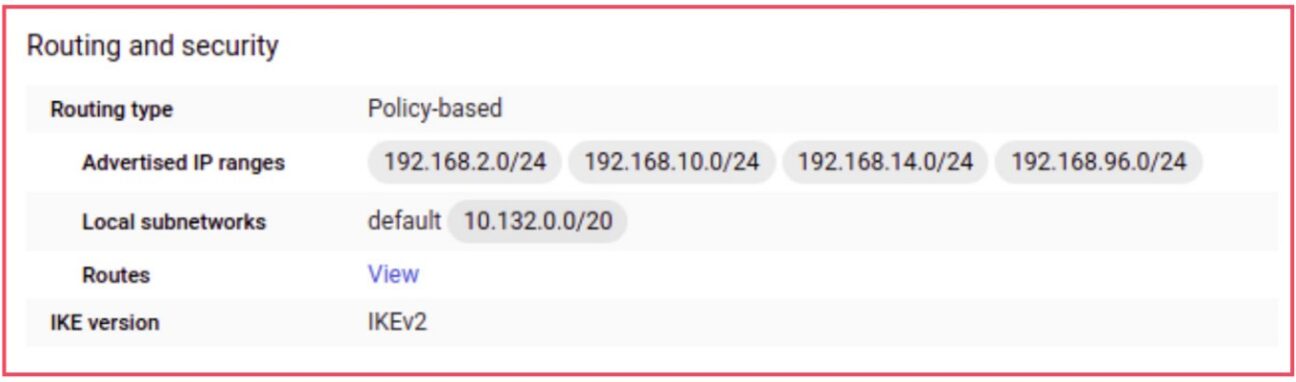
The tunnel had to be configured in both environments, On-Prem and GCP. At this point, we are only going to highlight the settings to run it on the GCP side. This way, it was necessary to configure the Google Compute Engine VPN Gateway (Network, Gateway IP Address, Region, among others), as well as the parameters for the IPSec tunnel (IKE version, Shared secret, Remote Peer IP Address and Routing Options). Highlighting the routing policy can be based on 3 methodologies: Dynamic (BGP), Policy and Route. Thus, it was set in the creation of the tunnel which networks communicated with each other between the two environments.
The image below illustrates the configured IPSec tunnel settings on the GCP side and the set routing policy.

By detailing the routing section, we check which networks are presented in the IPSec tunnel that allow communication between the two environments.
• IAM: roles and service accounts
There are roles and service accounts that have to be created in GCP in order to allow Velostrata to be able to create and handle resources in this environment. At this point let us assume that the GCP Organisation, Account and Project have already been created. The creation of roles and service accounts was performed using a set to a script made available by Google. The execution of the referred script allows for the creation of two distinct roles and their service accounts. One of the roles (Velostrata Manager Service Account) allows for the creation of all the necessary resources during the migration process (VMs, Cloud Storage Buckets, among others), and the other (Velostrata Cloud Extension Service Account) has the ability to manage the Cloud Storage API for migrations.
The steps described below for creating the settings (roles and service accounts) were followed:
- . Access Google Cloud Shell (1).
- Change the directory to run the script. cd /google/migrate/gce
- Set a name for the deployment, for example, depvelo..
- Run the velostrata_sa_roles.py script
- python3 velostrata_sa_roles.py -p project-ID -d deployment-name
- python3 velostrata_sa_roles.py -p poc-liftandsift-velostrata -d depvelo
Running the script resulted in the creation of the roles and service accounts illustrated below.
• Roles
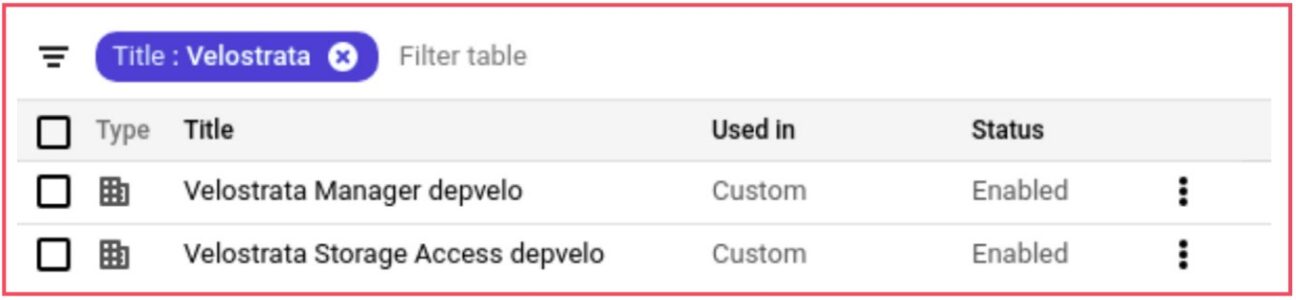
• Service Accounts

• Network (VPC on GCP, VMware and Firewall Rules)
Virtual Private Cloud (VPC) is the component in GCP that allows you to manage the network of resources resident in this environment, regionally and globally. Therefore, a GCP side default type VPC was configured in the europe-west1 region, associated with subnet 10.132.0.0/20. All resources, namely the VMs to be imported, will be left with an IP inside of the subnet mentioned above. In a scenario where VMs migrating to GCP must be on different networks, another type of VPC (Custom Mode) should be designed, which allows you to detail which subnet ranges to use, as well as the region in which it will be associated.
In the On-Prem environment, and as already illustrated in the VPN routing configuration that allows connection between environments, there are several subnets that must be taken into account:
- 192.168.2.0/24: LAN network where Velostrata Backend will be housed
- 192.168.10.0/24: MGMT network where virtualization components (VMware) are housed, namely vCenter
- 192.168.96.0/24: Operation & Maintenance (OM) network of VMs to migrate
- 192.168.14.0/24: RT (Real-Time) network of VMs to migrate
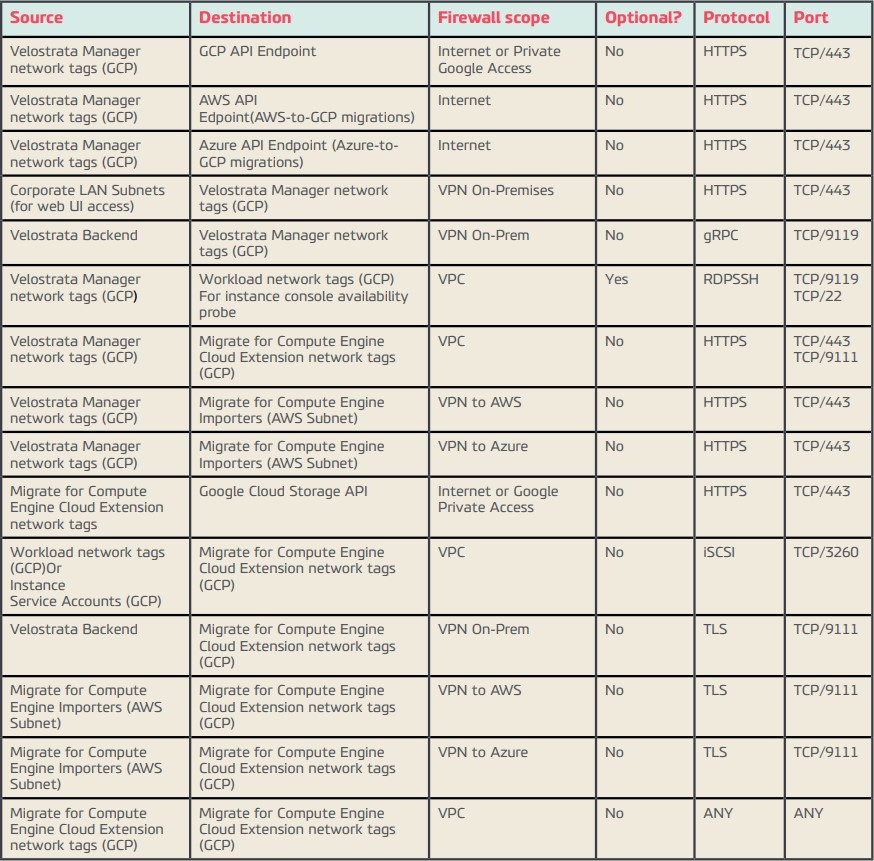
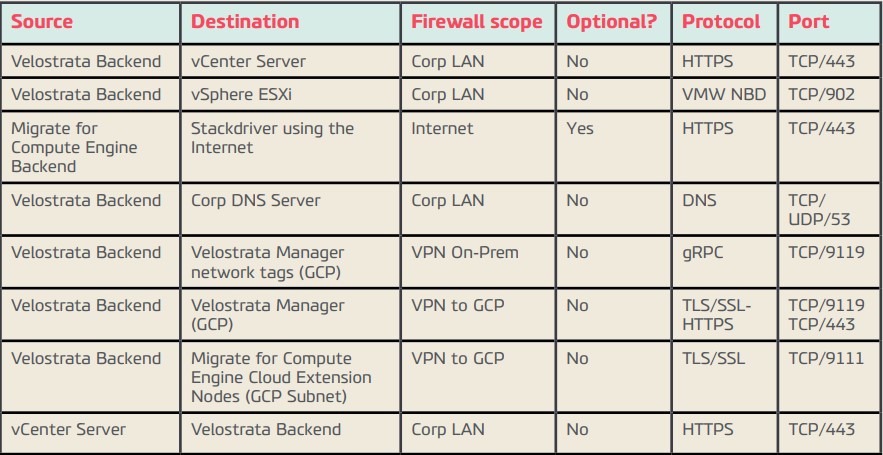
Communication between the various components that make up the system lacks the configuration of firewall roles in both environments, GCP and On-Prem. The table below defines which rules should be configured for communication between components to be possible.

• GCP VPC
• On-Prem
• Velostrata Manager (GCP)
Velostrata Manager is the component of the solution responsible for managing migrations and must be installed on a GCP side VM (Compute Engine). It was installed by using the GCP Marketplace (2) and during the deploy process, it was necessary to define a set of variables that we described below.
- Deployment Name
- Zone, zone, zone
- Machine Type
- Network, network, network, network
- Subnetwork
- Velostrata Manager Service Account
- Velostrata Cloud Extension Service Account
- Velostrata Manager and API password
- Private key encryption password
- Comma separated network tags (optional)
A token was created through this component that will be used in the process of deploying Velostrata Backend (to install from the On-Prem side). After deploying, access to Velostrata Manager was available via (HTTPS) web access with an IP range 10.132.0.0/20 . Access to the interface must be gained with the user «localsupport» and the password set in the deploy process (Velostrata Manager and API password).
• Velostrata Backend (On-Prem)
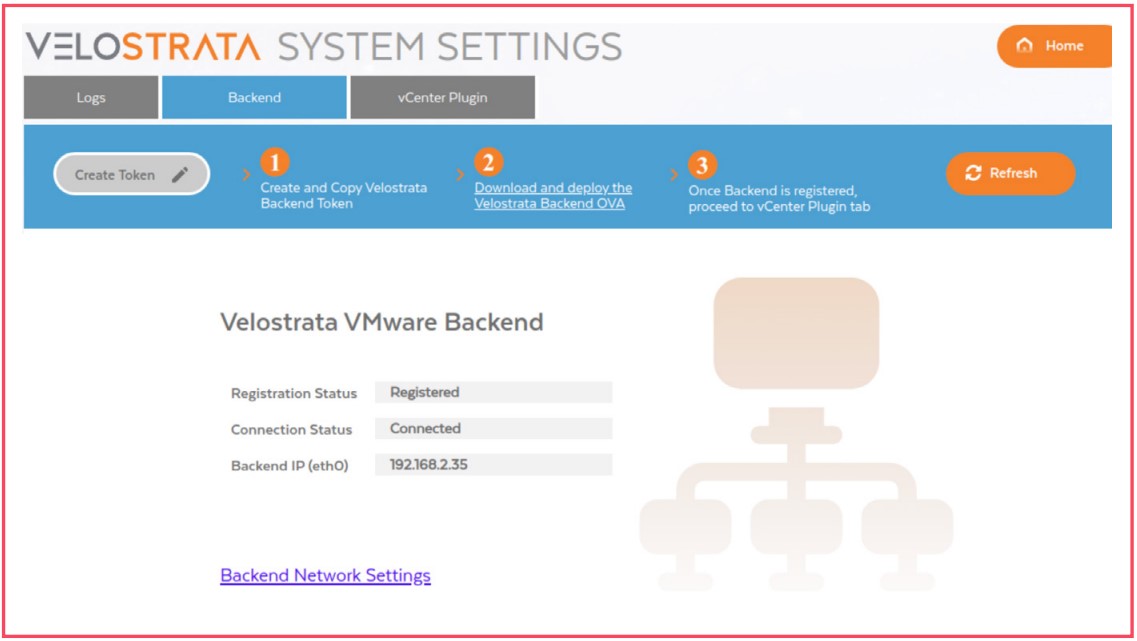
This component was installed in the On-Prem environment and it is responsible for connecting to the VMs disks in the On-Prem environment and enabling migration or the streaming of data to the GCP through the Cloud Extensions (see section dedicated to this component). The installation process consisted of the transfer of the last stable image (OVA) of this component and deployed it into VMware. During the deployment process, a token is required which had to be previously obtained via Velostrata Manager. If the process has been successful in accessing Velostrata Manager and the «Backend» section, you can verify that it is connected and registered.
• Velostrata Service Roles and Permissions on vCenter (On-Prem)
There is a set of rules and permissions that have to be configured in vCenter in a certain way to allow actions to be run on VMware during the workload migration process. For the sake of information synthesis in this report, we will not enumerate all the rules and permissions that have been configured.
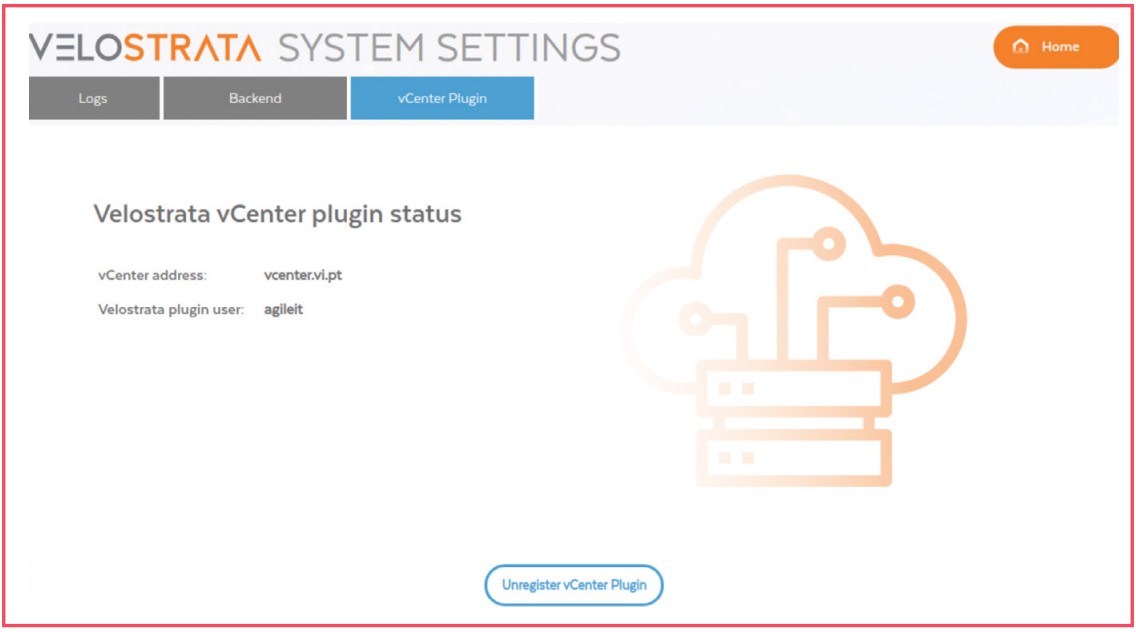
• Velostrata vCenter plugin
Once Velostrata Backend has already been properly registered and connected to Velostrata Manager, it is necessary to deploy and register Velostrata Vcenter Plugin. This plugin allows Velostrata management and monitoring operations to be available in vCenter UI. To register this component you will need to perform the following steps:
- Ensure that roles and permissions in vCenter have been properly created
- Access Velostrata Manager
- Click on the System Settings button
- Confirm that in the «Backend» section the information registered and connected shows
- Access the «vCenter Plugin» section
- Set the vCenter Address (FQDN or IP)
- Set the user to connect to vCenter
- Click on register the plugin
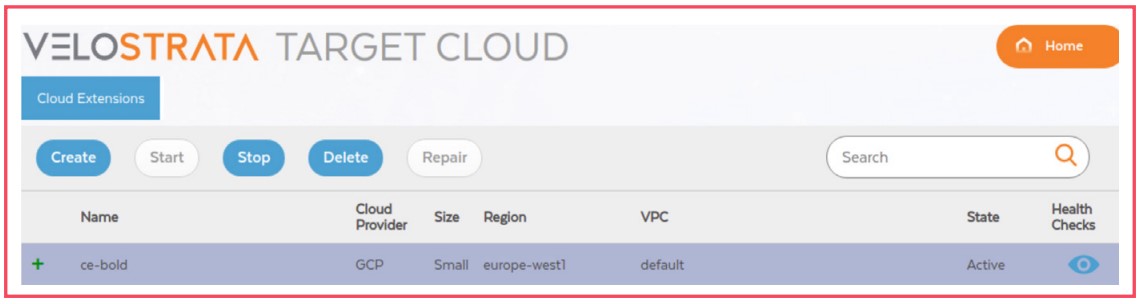
• Cloud Extensions
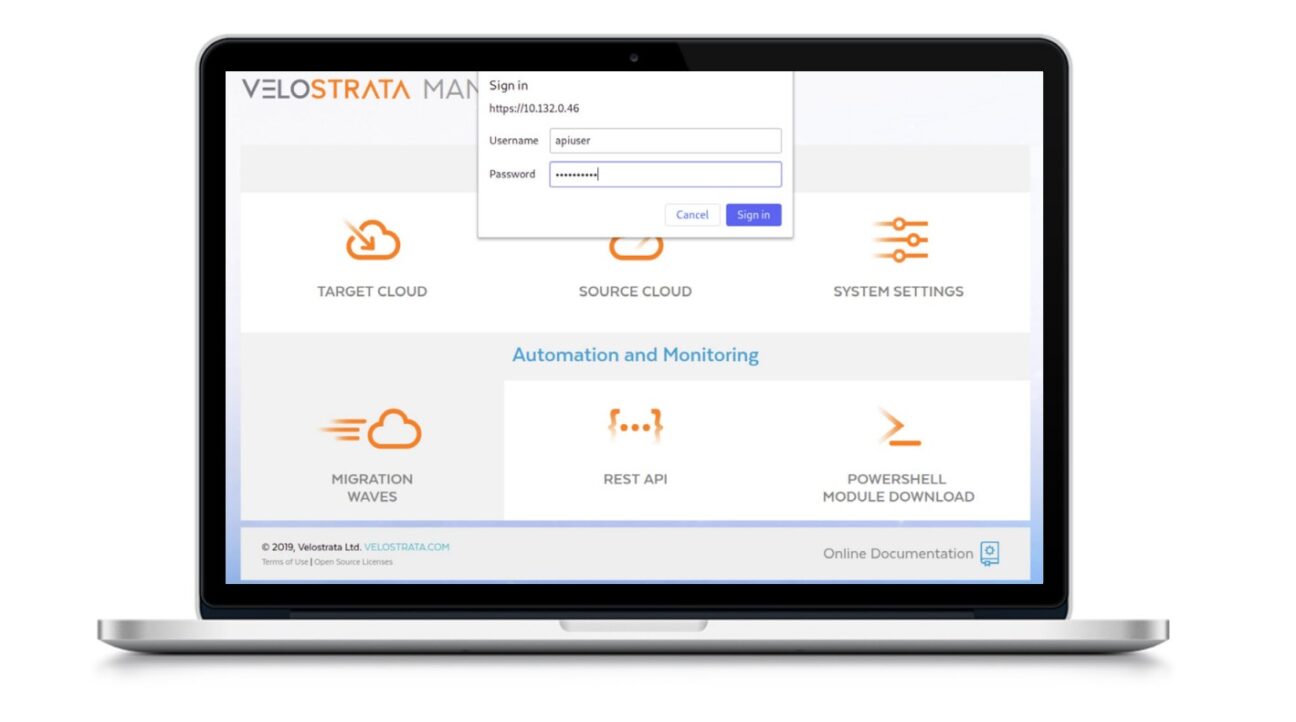
This component is characterised for being the «conductive medium» to facilitate the migration of VM storage to be migrated between environments (On-Prem and GCP). The configuration of this component can be performed in any one of the environments. The example below demonstrates the configuration of this component via GCP, in this case through the Velostrata Manager interface.
- Access Velostrata Manager.
- Click on the Target Cloud button. The user «apiuser» and the password
defined during the Velostrata Manager deployment process should be used. - Click on the Create button.
- Set the parameters shown below. «Network Settings” Section.
Once Velostrata Backend has already been properly registered and connected to Velostrata Manager, it is necessary to deploy and register Velostrata Vcenter Plugin. This plugin allows Velostrata management and monitoring operations to be available in vCenter UI. To register this component you will need to perform the following steps:
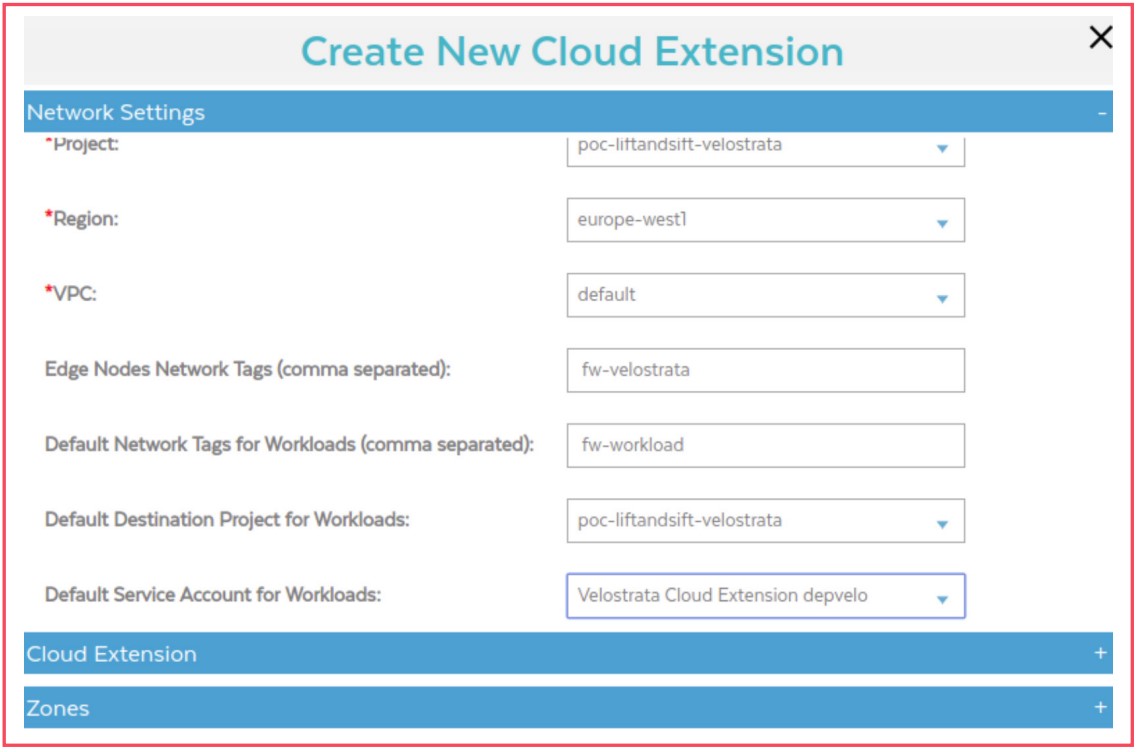
Project: Name of the project where Cloud Extension will be deployed and to which
VMs they will be associated with to migrate.
Region: Region where cloud extension will be deployed and to which VMs they
will be associated with to migrate.
VPC: VPC in use for migrations.
Edge Nodes Network Tags: Tags to enable firewall rules for these VMs.
Default Network Tags: Firewall rule tags for a particular workload that will be
migrated.
Default Destination Project for Workloads: Destination project to which worklo
ads will be migrated.
Default Service Account for Workloads: Service Account associated to migrated
workloads. This parameter is optional. Use HTTP Proxy: Optional. Used only if an
HTTP proxy is required for access to Stackdriver Monitoring and logs.
FQDN or IP: FQDN or HTTP proxy IP. Required if the HTTP proxy is active.
Port: HT TP proxy port. Required if the HTTP proxy is active.
Access object store via proxy: This option defines that objects are migrated via HTTP proxy. Otherwise, only control plane data are sent by the proxy.
5. Set the parameters of the «Cloud Extension» section.
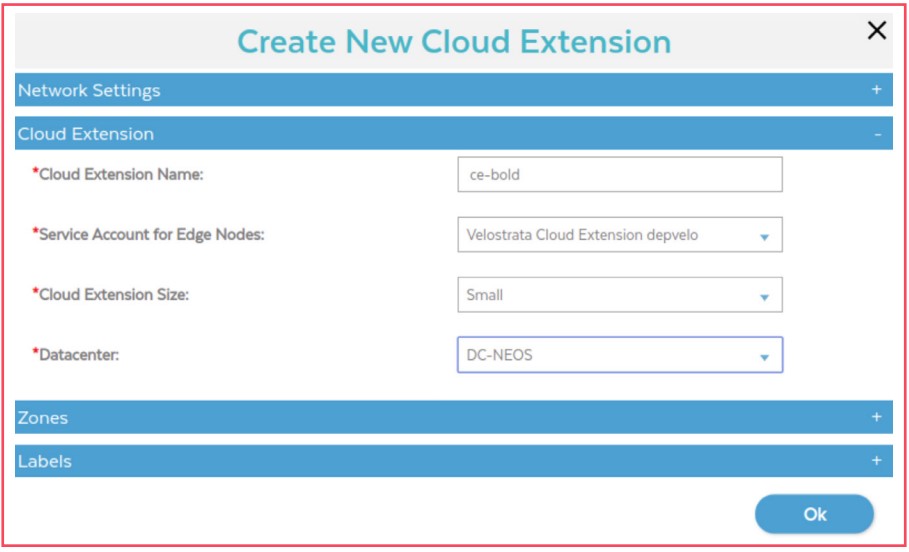
Cloud Extension Name: Cloud Extension Name.
Service Account for Edge Nodes: Name of GCP service account where cloud
extension nodes are running. By default velos-gcp-ce-sa.
Cloud Extension Size: Small (if less than 50 VMs are migrated in parallel) or Large
(if more than 50 VMs are migrated in parallel).
Datacenter: If Velostrata Manager is registered in a VMware environment, select
the Datacenter that will host the Cloud Extension.
6. Set the parameters of the «Zones» section
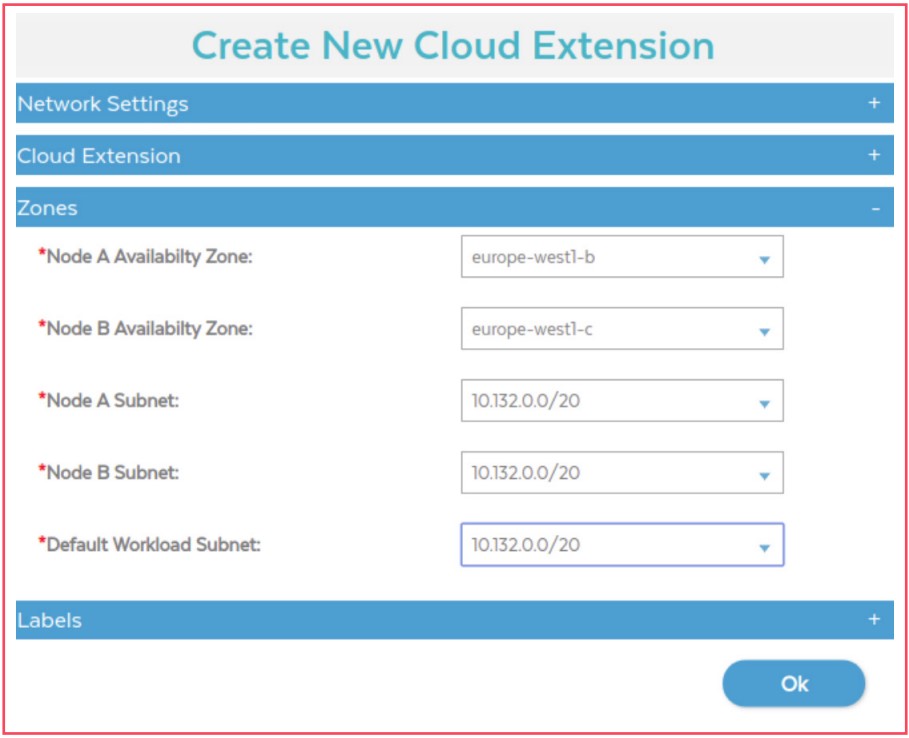
Node A Availability Zone: GCP zone where the Cloud Extension A node will be deployed. To ensure high availability and redundancy, select a different zone for nodes A and B.
Node B Availability Zone: GCP zone where Cloud Extension node B will be deployed. To ensure high availability and redundancy, select a different zone for nodes A and B.
Node A Subnet: Select the subnet for the zone of node A.
Subnet Node B: Select the subnet for the zone of node B.
Default Workload Subnet: Subnet where migrated VMs will be started.
7. Click on «OK» to create the Cloud Extension. The Cloud Extension creation
process is finished.
At this stage, all components essential to the migration process are identified, installed, and configured. In the next section, we will cover the migration of workloads phase, specifying the preparation of the VMs before being migrated, the various phases of the lifecycle of a VM during the process and the monitoring of it.
6. Migration Phase ( +/- 10 pages about migration, statistics, approaches, plan and execution)
When planning a migration of workloads to the Cloud there is a set of considerations that should be analysed in advance:
- Connection link between the On-Prem environment and the GCP environment
- Preparation of VMS
- Number of VMs to migrate
In terms of connection between environments, and since we have two redundant connections and distinct capacities in the On-Prem environment, we ran the tests using each of the available accesses, specifying:
- 100Mbps/100Mbps dedicated fiber link;
- 120Mbps/12Mbps non-dedicated fiber link;
At the end of this section, graphs are presented that illustrate the temporal evolution of the migration process according to the access in use.
The preparation of VMs is another focal point and needs to be taken into account in the planning of a migration. There is a set of components that must be installed on them before:
- Linux
- Velostrata RPM
- Google Cloud SDK
- Linux Guest Environment
- Windows
- Google Cloud SDK
- Windows Guest Environment
These components allow, among other things, access to the VMs after they have been migrated to GCP through users created in this environment.
The number of workloads to migrate is another focus of the migration plan. We may want to migrate only one VM as much as we may want to migrate multiple VMs in parallel. If you want to migrate only one VM, the resources to Velostrata operations via VMware vSphere will be sufficient to run the process. In the case of multiple VMs, migration by waves, via Velostrata Manager, is the most appropriate option since the process via VMware vSphere lacks individualised action.
Next, we describe the steps of the process of total migration from a VM to the Cloud (includes storage and is called Full Migration) and the steps so that the VM is running on the Cloud side but there is no migration of storage between environments (run-in-cloud), which means, the storage remains in the On-Prem environment.
The Run-in-Cloud option consists of starting a VM from the On-Prem environment in GCP. Data streaming technology is used between the two environments to present data from the On-Prem environment in the Cloud environment. The data is stored in the cache and in the object store of Velostrata so that it can be presented to the GCP side VM, keeping data streaming continuously between environments. There is always the possibility that data that is changed on the GCP side whether or not written back in the On-Prem environment.
Below are the steps to take for this action:
1. Access VMware vSphere Client and select the desired VM
2. Click on the right side above the VM and select «Velostrata Operations
«Run-in-Cloud»
3. Select the Cloud Extension
4. Set a name for the VM
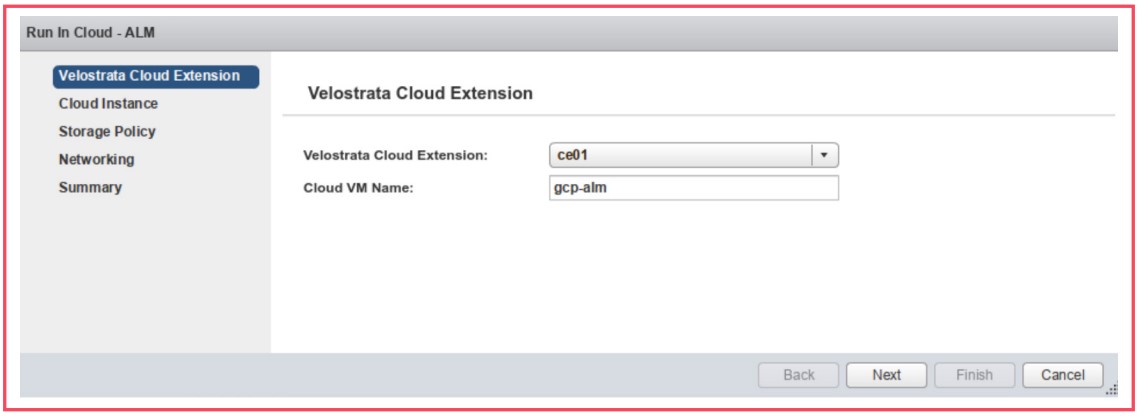
5. Click on Next
6. Define the project and the type of instance on the GCP side
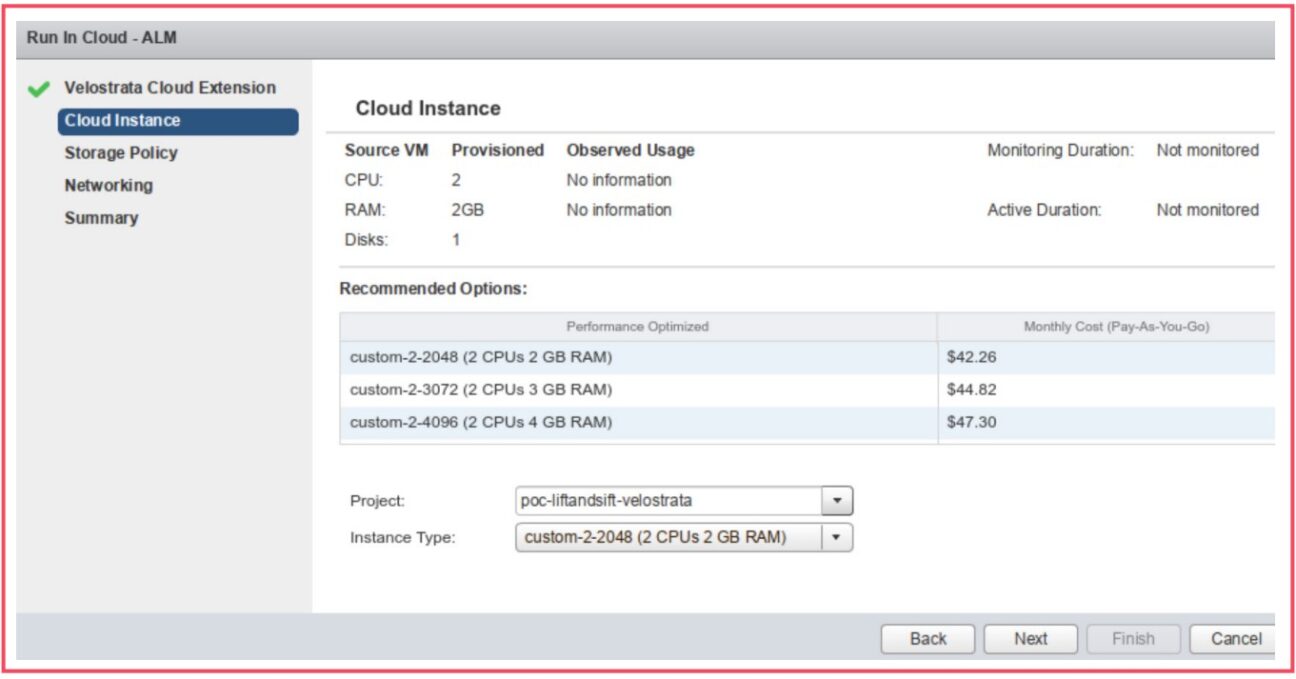
7. Click on Next
8. Define the Storage Policy
- In write back mode, all changes to the disks executed on the GCP side will be replicated in the On-Prem environment
- In write isolation mode, data changes are not written from the On-Prem side while the VM is running on the GCP side
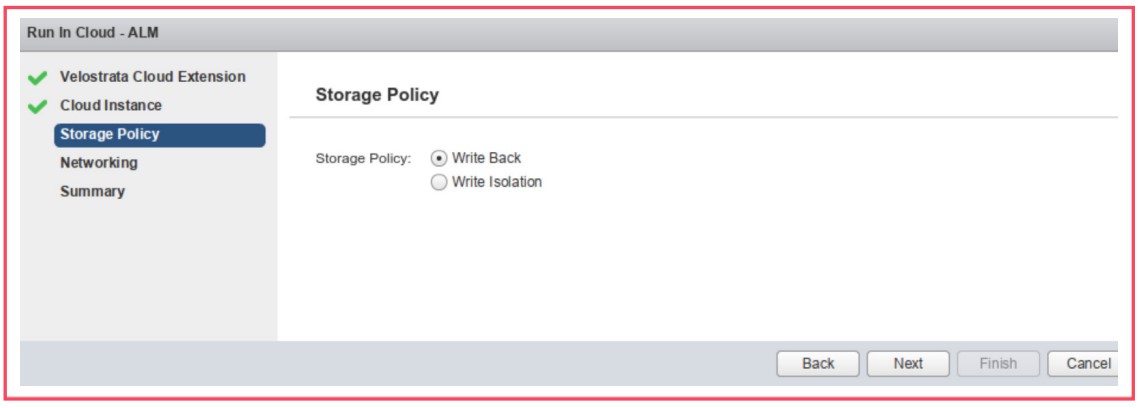
9. Click on Next
10. Define the Network parameters

11. Click on Next
12. Review the settings and click on Finish
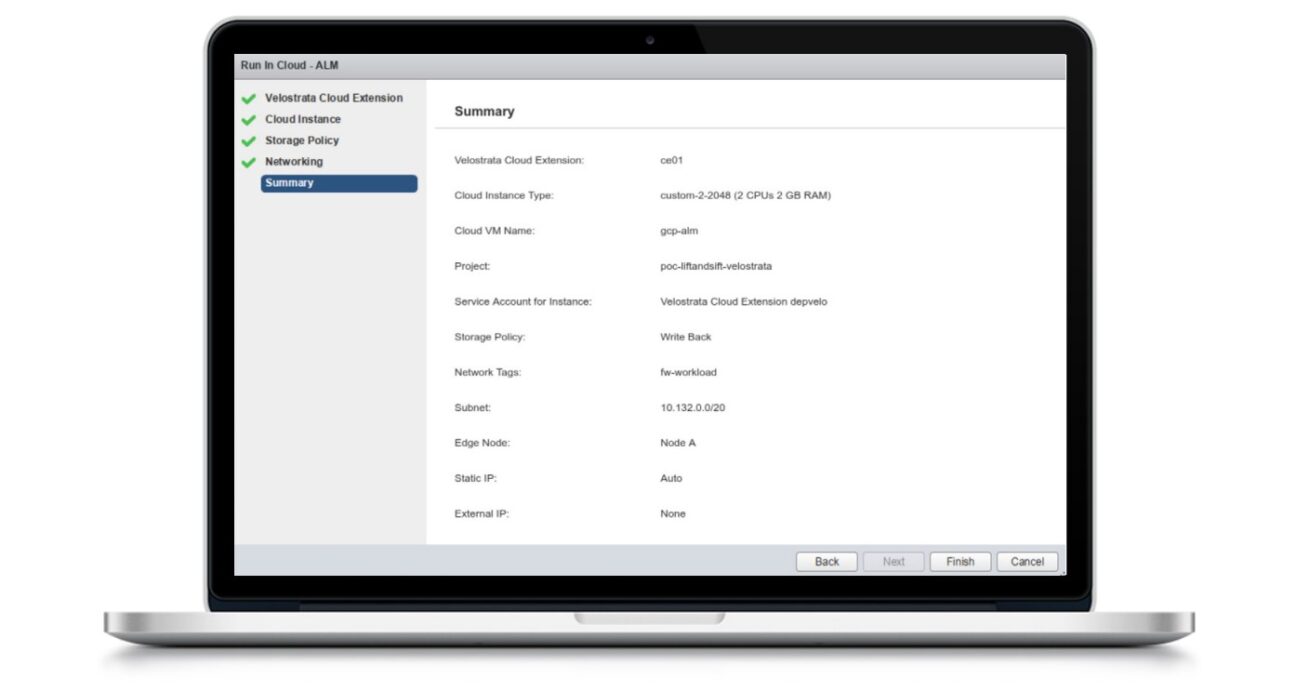
After these actions are performed, the VM in the On-Prem environment will shut -down and an instance on the GCP side will start.
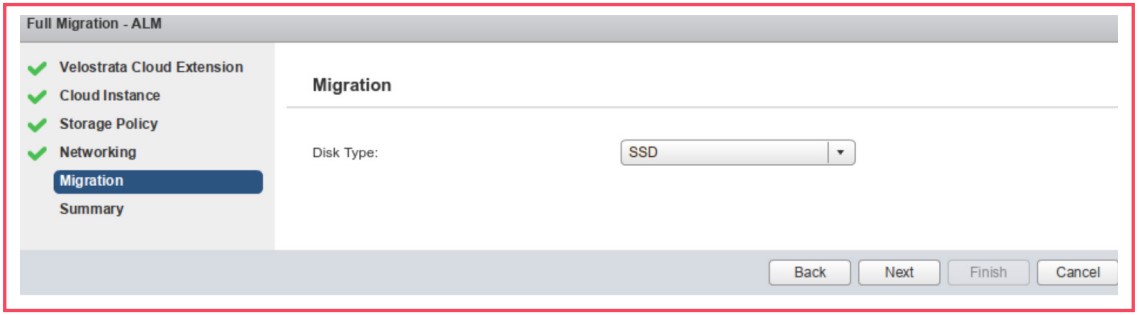
In the case of Full Migration, in light of the actions referred to above, the Velostrata operation called Full Migration should be performed instead of the Run-In-Cloud (previously referred to in point 2 above). In addition to the steps illustrated above, a section will be presented to define the type of storage to create in GCP. The image below illustrates an example of choosing an SSD disk for this purpose.
In summary, a Full Migration process encompasses the following steps:
- Running the Run-in-Cloud process
- Migration of data from VM to GCP. At this point, the access link between the two environments is a determining factor as it directly influences the time it takes to migrate the data
- After all the data is copied to the GCP, the VM is prepared for the next step, which consists of the GCP detach. This operation gets the VM disks from the Velostrata cache and object store so that the native disks are created from the instance in GCP
After the Full Migration process there are two phases through which the VM goes through:
- Detach
- The VM is disconnected from the Cloud side
- Last data synchronisation if necessary
- Added native disks to the instance (created in the Detach preparation process)
- Launching the instance on GCP
- Cleanup
- The VM is marked as unmanaged by Velostrata. The Workload is running autonomously on GCP
There are other phases of a VM’s lifecycle in the migration process which should also be highlighted. However, the steps mentioned above were the ones given the greatest emphasis when carrying out this case study. Below, we describe the remaining phases.
- Test clone: Creates clones of the selected VMs and tests them on the GCP. This action does not modify the data in the live environment because there is no write back to the On-Prem environment
- Delete clone: Removes the test clone from the GCP
- Move back: Moves the VM back to the On-Prem environment
- Offline Migration: In cases where the operating system or file system does not allow Velostrata data streaming technology to be applied
In the case of multiple VMs, such as in this case study, the process referred to previously is not at all feasible. Thus, migration by waves is the fastest way to ensure the migration of multiple VMs. This action
has to be triggered via Velostrata Manager, defined as a Runbook (file .CSV) that contains all the characteristics of the VMs to be migrated.
Below we explain the steps for performing a migration by waves
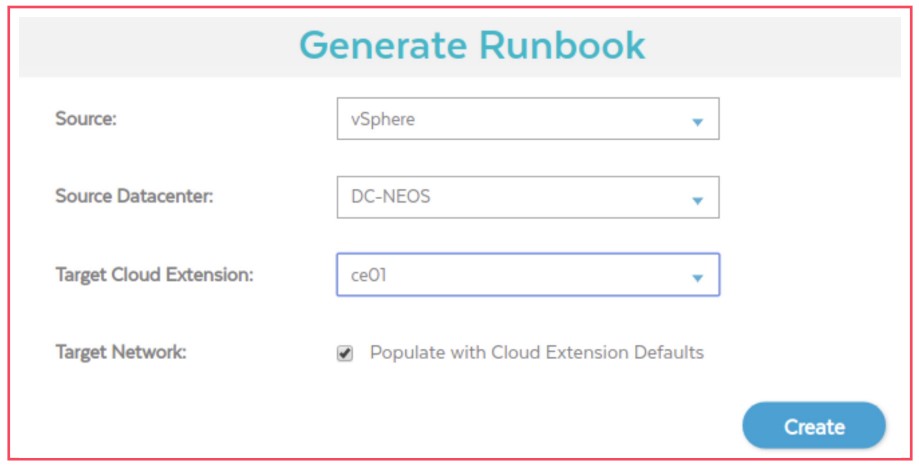
- Access Velostrata Manager via HTTPS using the user «apiuser» and select the «Migration by Waves» option.
- Click on «Generate Runbook» to create a .CSV file with all VMs in the selected datacenter.
- Remove the .CSV generated VMs that should not be included in the migration process.
- Change the RunGroup field of each of the lines of the VMs to be migrated to «1» given that the value «-1» means «skip», and if it remains the same, the VM will be ignored in the migration process.
- Fill in the «TargetInstanceType» field to define the type of instance to create on the GCP side for each VM to be migrated. At this point, the existing Types of VMs on the GCP side should be analysed in order to identify the one that most closely resembles the VM to migrate.
- The «TargetPublicIP» field must be filled in with the same name assigned to the Static IP addresses which must be previously created on the GCP console (in this case: ip-gcp-lamp and ip-gcp-ws2016).

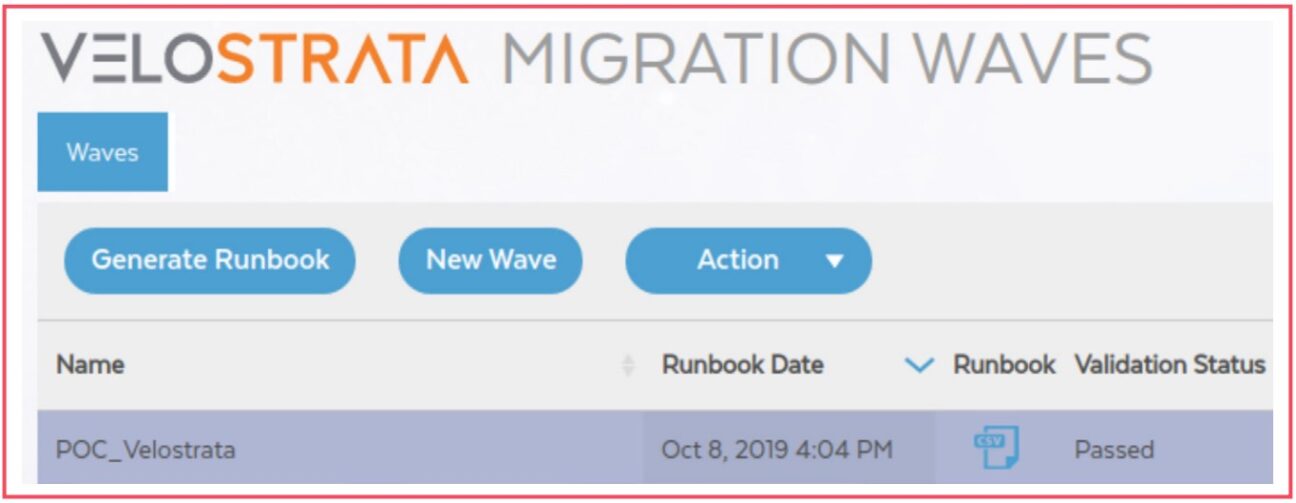
• Create a Wave by setting the name and importing the previously created Runbook
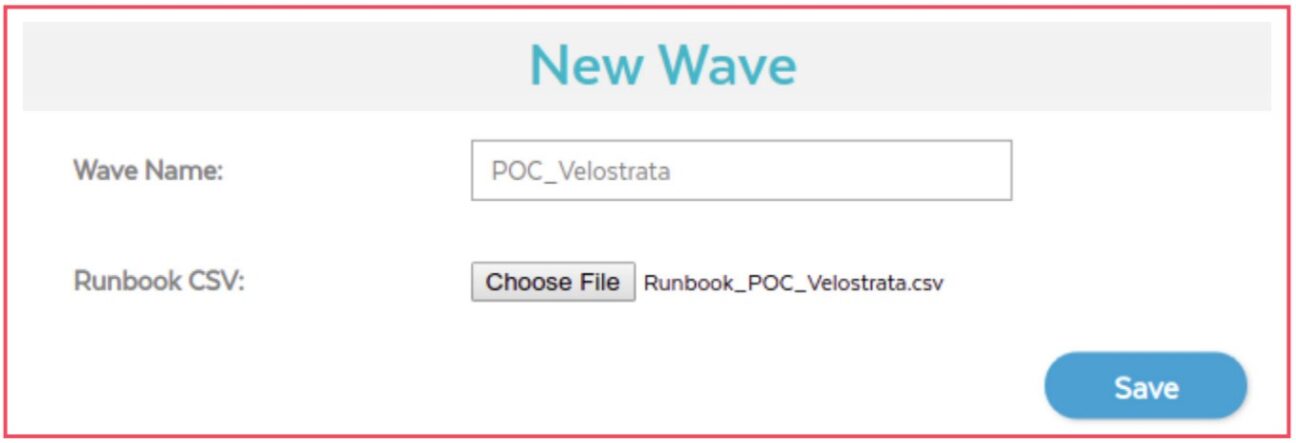
• Validate the imported Runbook. In the case of failure, what has failed can be verified (click on «Failed» status if this occurs) and subsequently update the Runbook after correction.
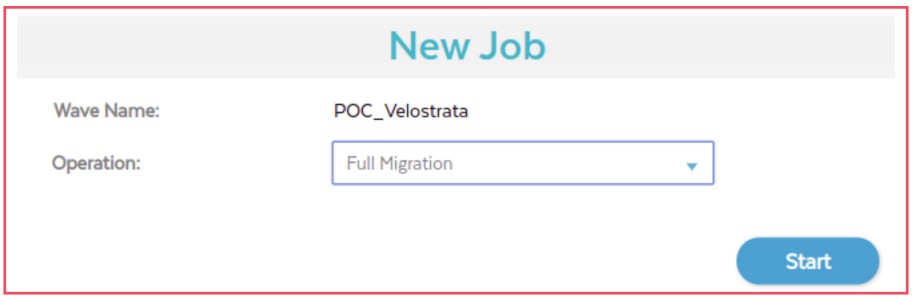
• Once the .CSV has been validated 100%, in the dropdown box «Action» select the option for «New Job». Set the action to run: «Run In Cloud”, «Full Migration», «Offline Migration», «Test Clone», «Delete Clone», «Move Back», «Detach» or «Cleanup». The first phase of the migration consists of performing
a «Full Migration»
• Once you have terminated the JOB, validate its status
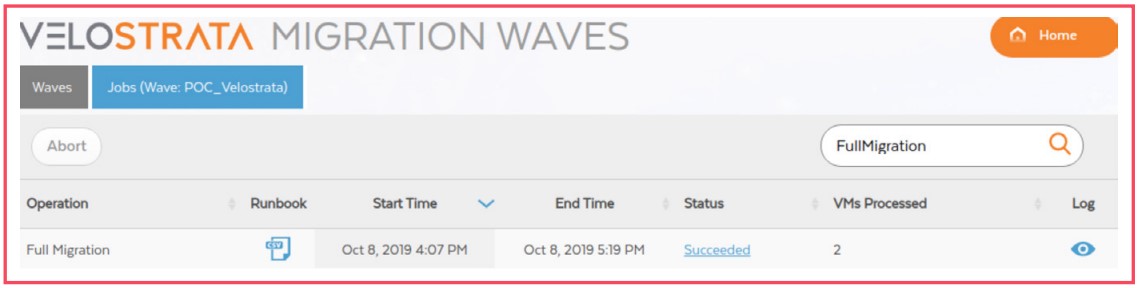
• As in the previous section (VM migration via VMware vSphere), if the Full Migration process succeeds, you will need to create new jobs to run Detach and Cleanup.
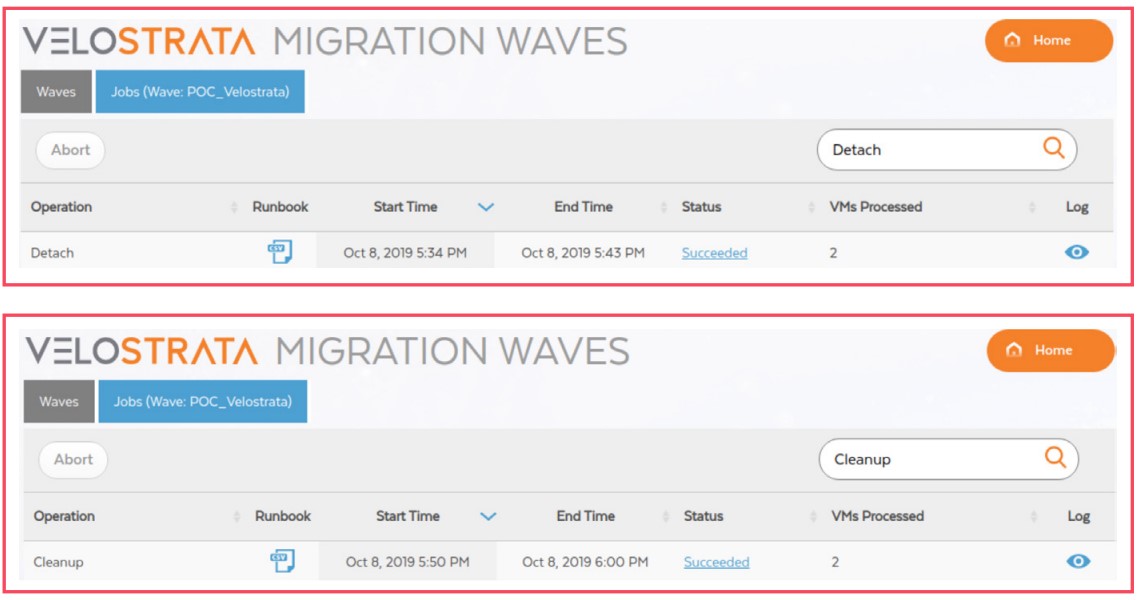
This migration process for the two workloads was performed using the two internet links referred to throughout this case study. The amount of useful data transferred can be verified using metrics taken from the GCP StackDriver that illustrates the total size of each of the buckets created during the migration phase.
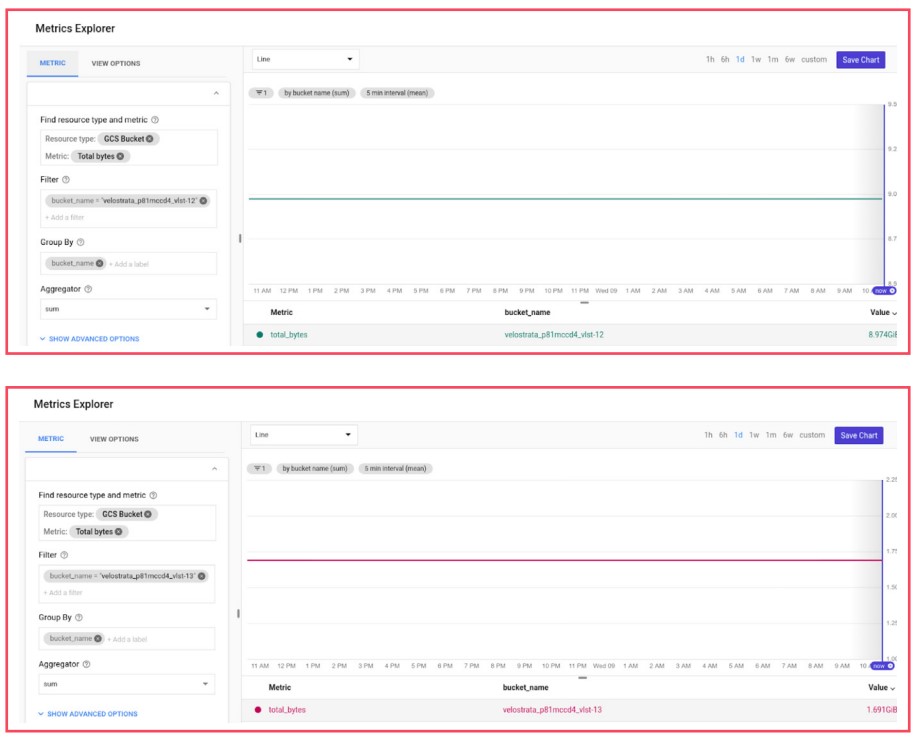
The amount of data transferred during the migration process is around 10 GB.
The graphs below represent elapsed time in each of the previously specified phases of the migration process (Full Migration, Detach, and Cleanup) using each of the two access links in the On-Prem environment.
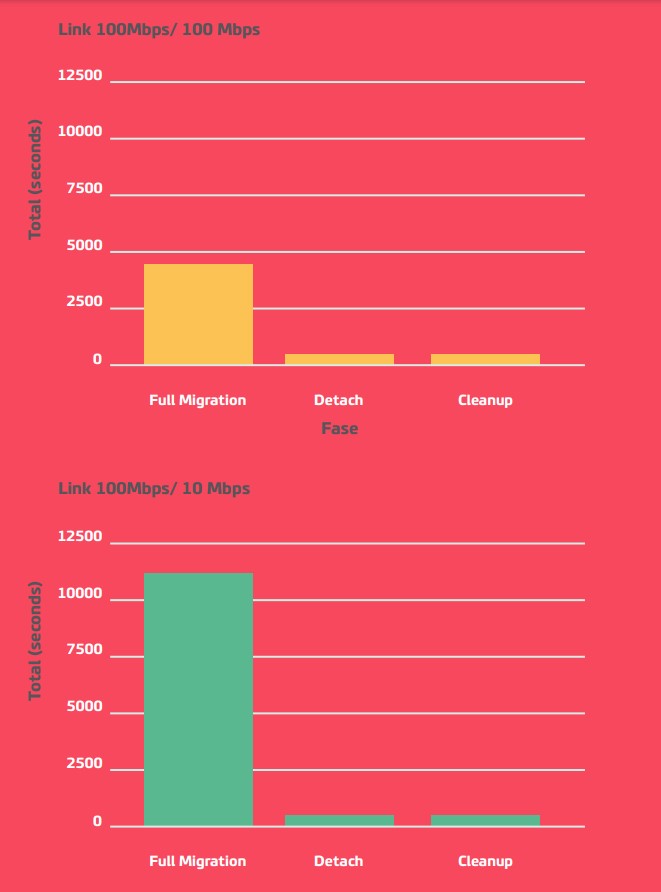
The Full Migration process, as mentioned above, encompasses several «steps» so this is the most time-consuming and complex phase of the process. During this phase, there is a data migration process between the On-Prem environment and GCP, which depends directly on the utilisation link. In the graphical analysis we can verify, as you would expect, that the process is faster using the 100Mbps/100Mbps link. Although the graphs do not fully illustrate the order of magnitude between the links, the main objective is to demonstrate that this is a determining factor for accelerating the migration process.
Once the entire migration process has been completed there is still a step that needs to be analysed. This step consists of validating the correct functioning of workloads that were migrated to GCP. It is expected that the information migrated between environments remains consistent and that the services are fully functional after migration. In the following paragraphs, we describe some validations that are analysed on each of the systems migrated (Linux and Windows).
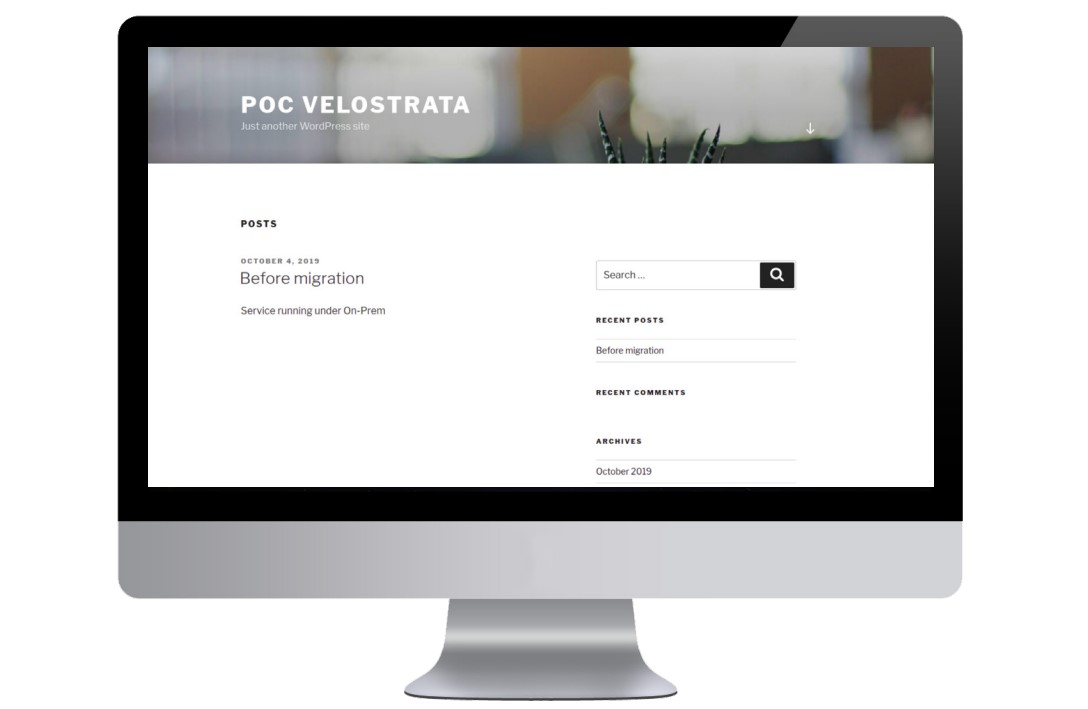
In the case of the Linux environment, which we have already mentioned consists of a LAMP server, a WordPress was installed with a very simple website for testing. The image below illustrates the site installed on this server and which is properly functional in the On-Prem environment (http://192.168.96.94/). A post was inserted on the site before the start of the migration process to GCP for further validation of data consistency.
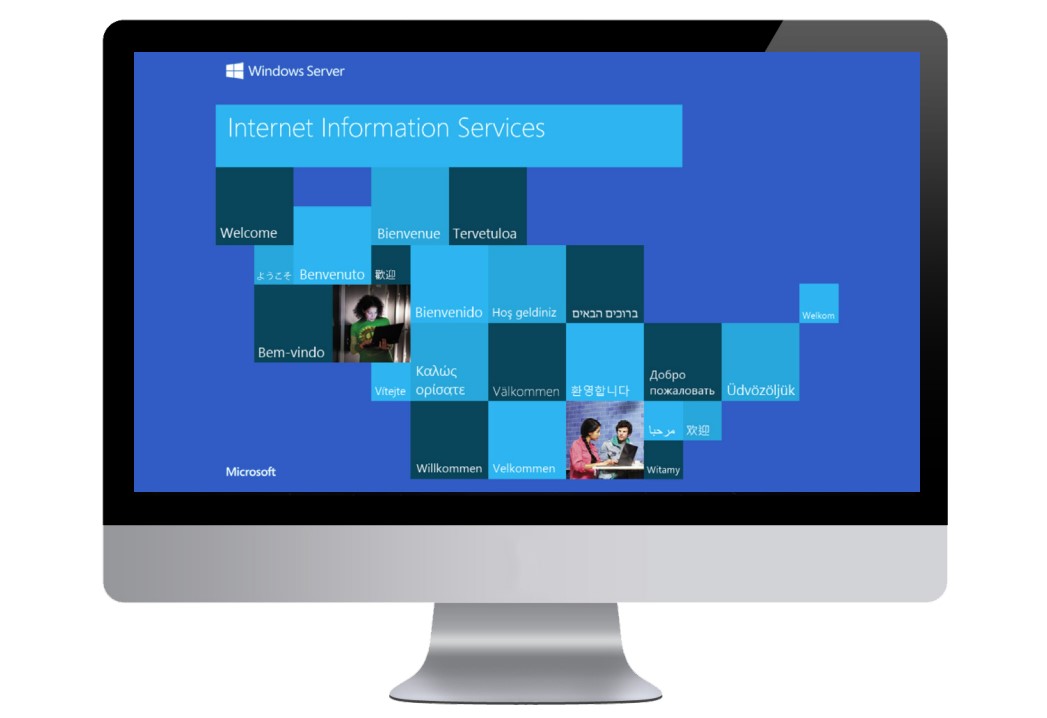
Regarding the Windows environment, IIS was activated with the Default Website. The image below illustrates access to it in the On-Prem environment (http://192.168.96.118/).).

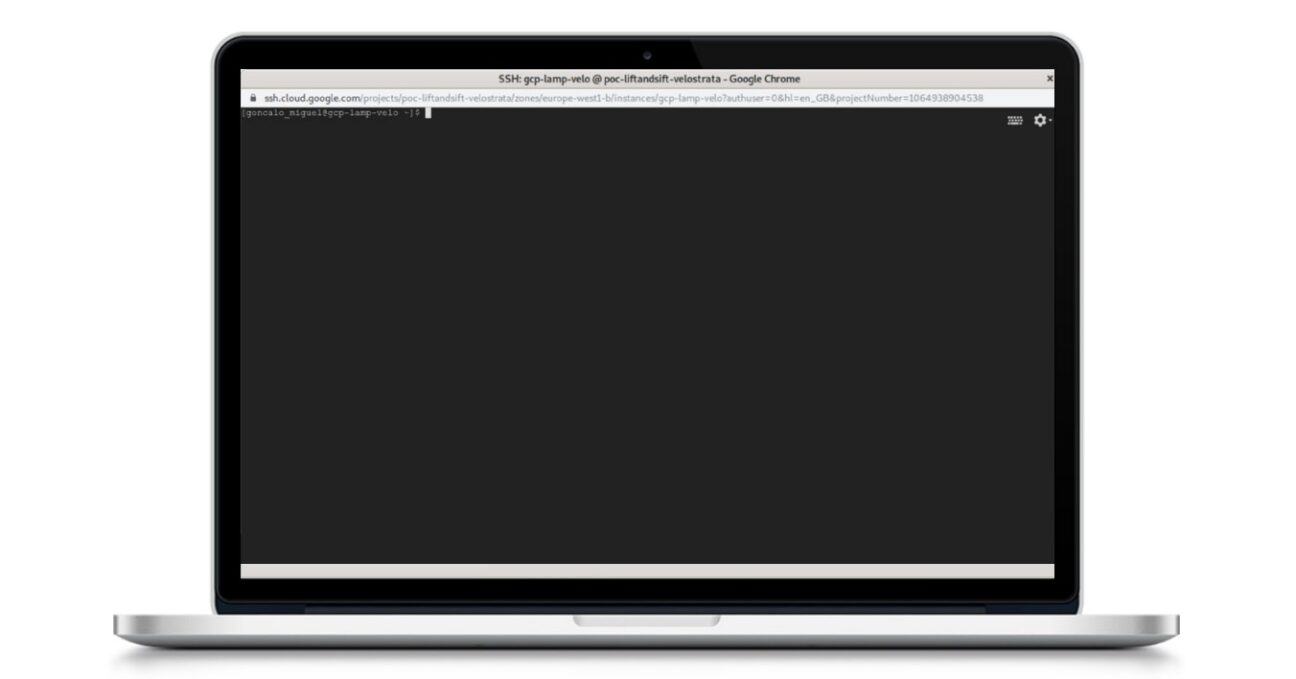
The first test to run corresponds to console accessibility to VMs, whether SSH (for the Linux case) or RDP (for the Windows case). The images below demonstrate the possibility of access to them via console.
SSH access (Linux)
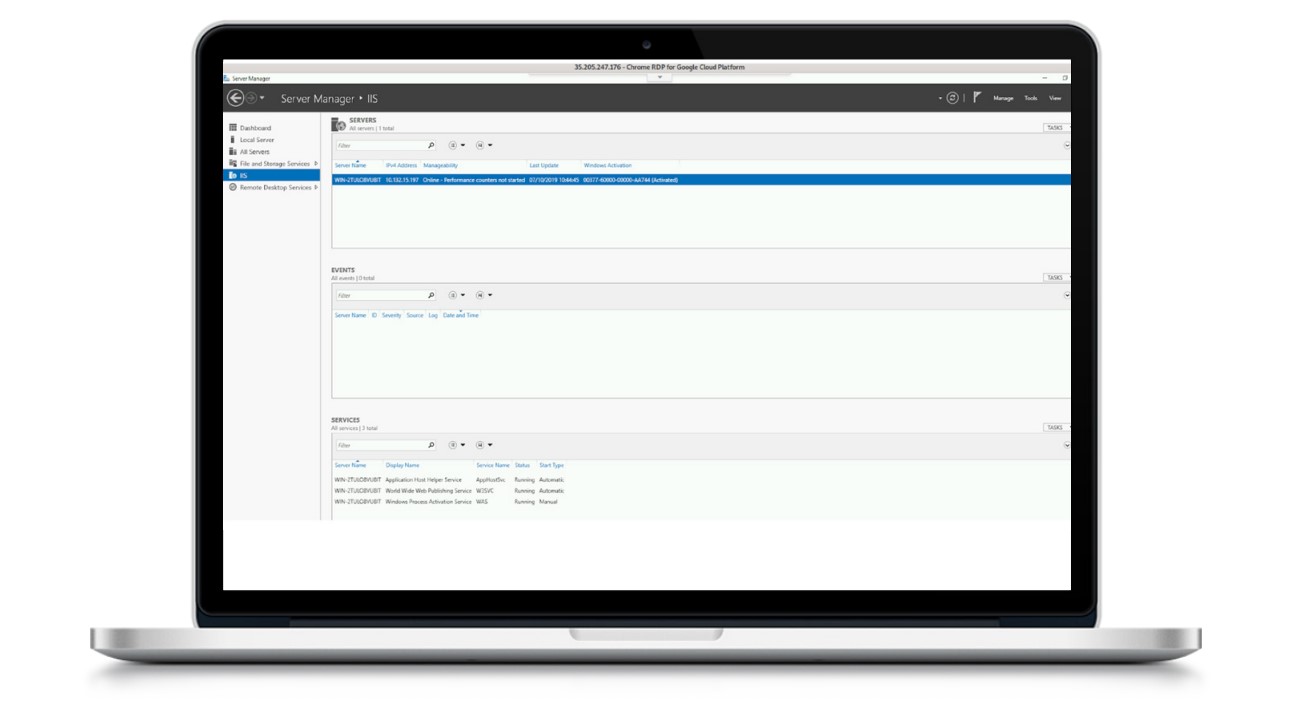
RDP access (Windows)
The second test is to validate if the workloads remain functional on the GCP, i.e. access to WordPress (Linux) and Windows (IIS).
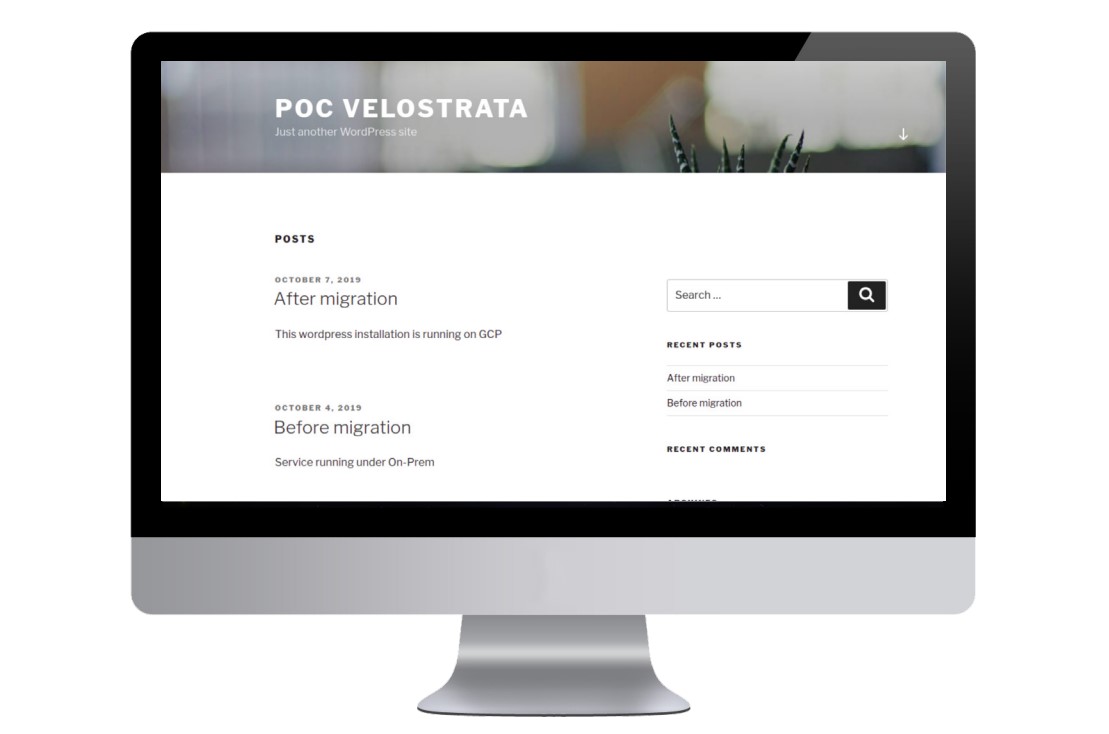
The image below illustrates the site of the properly functional LAMP server in the GCP (http://35.195.25.37/) and a post inserted post-migration. It is possible to verify if the post you entered pre-migration is also on the site.
IIS is also accessible after migration to the GCP. The access IP is 35.205.247.176was referenced in the workloads image on the GCP.