
✏️ This article is written by Sijohn Mathew, Senior Cloud Architect in Devoteam G Cloud in Stockholm
What will you learn?
In this guide, you’ll learn how to run open-source models like the Falcon-7B or Dolly by Databricks in a containerized Google Cloud environment. With step-by-step instructions as well as convenient GitHub code references, this article is an invaluable companion on your deployment voyage.
ToolBox Essentials: Gathering components
On our journey with Falcon 7B, a smaller but computationally demanding open-source model, we confront the GPU challenge. To address this, we leverage cloud-based GPU capabilities. However, containerizing our LLM and enabling GPU support is no straightforward task. This is where Truss, an open-source tool, comes to our aid. Truss streamlines model containerization by automatically creating dockerfiles and managing Python dependencies. As a result, it simplifies deployment with GPU support.
The blueprint:
1. Inception: Set up Falcon 7B using Truss
2. Manifestation: Containerize the model and run it using docker
3. Ascension: Create GPU-Enabled GKE Cluster
4. Orbit Reach: Deploy the Model
5. Galactic Gateway: Launch the Interface as a Web App in Cloud Run using Gradio Framework
Step 1 – Inception: Set up Falcon 7B using Truss
Firstly, create a new Python project (Python ≥ 3.9), then download and package the model from Hugging Face using Truss:
python3 -m venv env_name
source env_name/bin/activate

pip3 install truss
Now create a temporary script, main.py, in your project directory for working with Truss. Set up the Truss package by running the following command:
truss init falcon_7b_trussIf prompted to create a new Truss, press ‘y’. This creates a directory called falcon_7b_truss in your project directory.
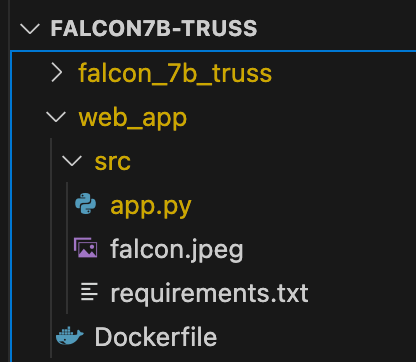
Files in falcon_7b_truss directory:
model.py(contains code to load the model)config.yaml(contains deployment settings)

Truss handles most tasks automatically. Each model should support _init_, load, and predict functions:
_init_: For creating class variables.load: To download the model from Hugging Face.predict: To call our model.
Here you will find the full code for model.py
- This code defines a Python class called
Modelthat implements a language model using the Falcon-7B-Instruct model from Hugging Face, featured on TechRadar by Devoteam. - The
Modelclass has aloadmethod that loads the pre-trained model and tokenizer from the Hugging Face model hub. - The
Modelclass also has apredictmethod that takes a prompt as input and calls the model usingself.pipeline. Thetorch.no_gradtells Pytorch that we are in inference mode, not training mode.
Well done, model setup is finally complete!
Step 2 – Manifestation: Containerize the model and run it using docker
2.1 Configuration
Traditionally, when we containerize a model, we package the model binary and its Python dependencies within a Flask or FastAPI server. But Truss simplifies this repetitive task, leaving us with just one job: supplying the Python dependencies.
Our model’s configuration is stored in the config.yaml file. Here, we specify the model’s dependencies. While it already contains the necessary basics, we need to add a few things.
Here are the items you need to add to config.yaml.
We’ve included a list of requirements that covers all the essential dependencies needed for downloading and running the model.
Now we still need to add resources for runtime, specifically “use_gpu: true”. This tells Truss to generate a Dockerfile with GPU support. With these modifications, our configuration is complete.
2.2 Containerization
In the “main.py” file, we’ll instruct Truss to bundle everything together.
This is the process:
- Load the
falcon_7b_trussdirectory. - Let the
docker_build_setupfunction handle the complex jobs (creating a Dockerfile or configuring the Fast API server). - Check the
falcon_7b_trussdirectory to find the newly generated files. - Once everything is ready, execute the Docker command to construct our Docker image:
docker build falcon_7b_truss -t falcon-7b-model:latest
Now tag the Docker image and upload it to a Container Registry, such as Google Cloud Artifact Registry or Docker Hub (I am demonstrating it using Google Artifact Registry).
Here are the commands you’ll need to execute once the image is built.
Tip: Before proceeding with the next steps install the gcloud command line utility.
And we are ready to let our model soar in the cloud!
Step 3 – Ascension: Create GPU-Enabled GKE Cluster
To run the container, create a minimal GKE cluster. However, building the GKE container is beyond this article’s scope. Therefore, head to the Google Cloud Console to create the Cluster with the specified configurations using either the GUI or Command line.
Tip: Ensure sufficient quota for GPU-enabled machines in IAM & Admin and monitor the metric compute.googleapis.com/gpus_all_regions.
Keep in mind, GKE comes with a cost. We’re setting up a single-node cluster with a less powerful GPU. The estimated expenditure for this experiment ranges from $2-$3.
Here’s the command to generate the GKE Cluster. Usee the following specifications:
- 1 node, standard Kubernetes cluster (not autopilot)
- 1 Nvidia T4 GPU
- n1-standard-4 machine (4 vCPU, 15 GB memory)
Tip: Select us-central1-c Zone during Cluster creation. Many zones don’t have nodes with GPU Support. Explore to find the right zone.
If you are using the GUI, choose the below settings:

And we can finally launch our model into action!
Step 4 – Orbit Reach: Deploy the Model
4.1 Deployment Description
To deploy the model on the cluster, create a Kubernetes deployment and service using the provided YAML files (sm-truss-falcon-deployment.yaml and sm-truss-falcon-ilb-service.yaml).
You need to create a deployment file called sm-truss-falcon-deployment.yaml and a service file sm-truss-falcon-ilb-service.yaml.
Open that file and paste in the following code.
The YAML file above defines a Deployment for a single Pod. This Pod runs a specific Docker image, listens on port 8080, and has access to one GPU. It is labeled under the component name “truss-falcon-7b-layer.” To specify the image location, you should include the Google Cloud Platform region, project ID, and Artifact Registry repository name.
4.2 Service Description
Here is the code for the service description.
The YAML file above creates an internal load balancer in GKE. It directs TCP traffic to pods labeled component: truss-falcon-7b-layer, translating from service port 80 to target pod port 8080. This setup enables global access across various regions and zones, with a key emphasis on annotation.
networking.gke.io/load-balancer-type: "Internal": Instructs GKE to create an internal load balancer.networking.gke.io/internal-load-balancer-allow-global-access:"true": Permits the internal load balancer to be reached from various regions and zones within the same VPC in GKE.
Create the deployment by running this command:
kubectl create -f sm-truss-falcon-deployment.yamlCreate the service by running the following command:
kubectl create -f sm-truss-falcon-ilb-service.yamlIf you run this command It will take a few minutes for the deployment to change to the ready state:
kubectl get deploymentskubectl get svcRemember the model has to get downloaded from Hugging Face each time the container restarts.
Check the progress of your container by running the following command:
kubectl get podskubectl logs <pod-name-from above-output>You’ll notice print statements about model file downloads. After the model is downloaded and Truss builds the microservice, you’ll see this output in your logs:
{"asctime": "2023-08-05 23:04:40,646", "levelname": "INFO", "message": "Completed model.load() execution in 320536 ms"}
As you can see, the model is loaded and ready for action. To obtain the name of your service, execute the following command:
kubectl get svcThe output should look as follows:
NAME                          TYPE           CLUSTER-IP   EXTERNAL-IP   PORT(S)        AGE
kubernetes                    ClusterIP      10.96.0.1    <none>        443/TCP        50m
truss-falcon-7b-service-ilb   LoadBalancer   10.96.1.165  10.x.x.x      80:32434/TCP   6m19s
The truss-falcon-7b-service-ilb is the one we want to call.
Awesome, our model is available as a REST API endpoint at 10.x.x.x:80 . We can access this API using the mentioned IP only from a VM hosted in the same VPC.
But here we are going to expose the API using a web app built using Python library Gradio and the app will be hosted on Cloud Run.
Congratulations! The Falcon 7B model is now containerized and operational in the GKE Cluster.
Step 5: Galactic Gateway – Launch the Interface as a Web App in Cloud Run
In this phase, we need to:
- Configure a Cloud DNS record to target the Internal Load Balancer (LB) IP. (This can be skipped and can use the Internal LoadBalancer IP directly in the Cloud Run Source Code)
- Set up a Serverless VPC Connector, enabling Cloud Run to access the Internal IP within our Virtual Private Cloud (VPC).
- Modify the Gradio Python code to reference the Cloud DNS Record and deploy it to Cloud Run, utilizing the aforementioned Serverless VPC Connector.
5.1 Set up a Cloud DNS
- In the Console, visit Network services -> Cloud DNS
- Create a DNS Record by clicking “Add Standard”
- Change the IP address to point to the Internal LoadBalancer IP
At this point, we now have a mapping from myservice.sm-llm-demo.internal to the LoadBalancer.
5.2 Define Serverless VPC Access
- Go to VPC network -> Serverless VPC access and click CREATE CONNECTOR.
- Choose the same region for the connector as the one where Cloud Run will be deployed.
5.3 Update the Gradio Python and deploy it to Cloud Run
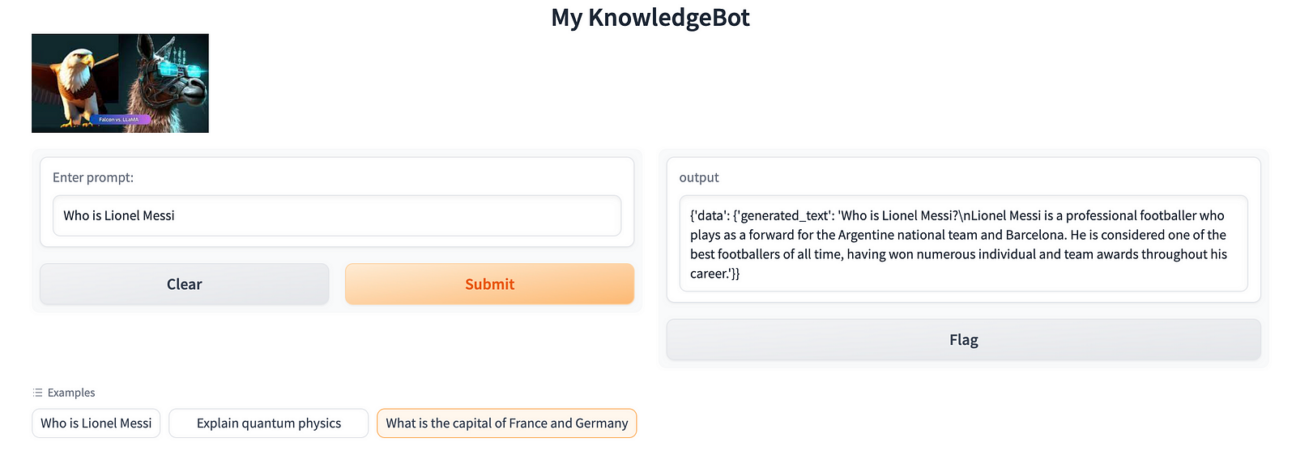
Here is the structure of my Gradio web app:
The provided code sets up a basic Gradio interface for users to input prompts and receive model responses. The model is accessed using an API call to “myservice.sm-llm-demo.internal,” and the predict() function sends a request to the model service and receives the response.
Here you will find the requirements.txt
This Dockerfile will create a Docker image that can be used to run the Gradio interface in a Cloud Run Instance.
Run these commands to build the Docker image (or use docker commands to create the build):
gcloud auth configure-docker europe-north1-docker.pkg.dev
gcloud builds submit --tag=europe-north1-docker.pkg.dev/<project-id>/<my-docker-repo>/genai-falcon-chatbot
Eg: gcloud builds submit --tag=europe-north1-docker.pkg.dev/sijohn-playground-v2/sm-docker-repo/genai-falcon-chatbot
Deploy the Docker image you built to a Cloud Run instance that’s located in the same region as the Serverless VPC Connector we set up in Step 5.2.
gcloud run deploy genai-falcon-chatbot --port 7860 --image europe-north1-docker.pkg.dev/<project-id>/sm-docker-repo/genai-falcon-chatbot --allow-unauthenticated --region=europe-west1 --platform=managed --vpc-connector=sm-vpc-connector-1After deploying Cloud Run, you’ll finally receive the endpoint URL for accessing the Gradio App:
Step 6: Clean Up
Once you are done with it, don’t forget to clean up the deployment and GKE Cluster to avoid unexpected Cloud Bills. Alternatively, we can delete the GCP Project to clean up all resources.
Conclusion
In this blog post, we touched upon the things needed to deploy an LLM into a Kubernetes Cluster at a basic level. We packaged the model using Truss, containerized it using Docker, and deployed it in Google Cloud using Kubernetes. Finally, we exposed the LLM via an API and consumed it using a chat-based Web App deployed in Cloud Run. Although it may seem overwhelming and challenging, we managed to accomplish it successfully.

Want to reach new heights with the help of our cloud experts? Contact us and discover our solutions 🚀☁️

